Reset Bank Reconciliation in Sage 50
Updated On: April 16, 2025 7:25 am

In Sage 50, bank reconciliation is essential to ensure that your actual bank balance matches your Sage 50 bank balance. However, users may occasionally need to reset the bank reconciliation for various reasons, which are outlined in the following section. Learn the complete process of how to reset the bank reconciliation in Sage 50 in this blog post.
User Navigation
Accounting Professionals & Specialized Experts
Want quick help from accounting software experts? Get in touch with our team members who can install, configure and configure your software for you. Proficient in fixing technical issues, they can help you quickly get back to work whenever you encounter an error in Sage software. Our team is available 24/7 365 days to assist you. To get in touch.
Disclaimer:
Backup Warning:
Use caution when resetting the bank reconciliation in Sage 50. Always create a backup of your files or data before proceeding with the solutions provided.
Why Should You Reset the Bank Reconciliation in Sage 50?
There can be multiple reasons for resetting the bank reconciliation in Sage. A few of them include:
- The prior month’s account reconciliation has already been posted, and a difference amount has now been determined.
- Even if the ending balance matches the opening balance and no transactions are cleared, there may still be unresolved amounts.
- Sage 50 Canadian Edition is reading the wrong figures because the bank reconciliation database contains some inaccurate data.
- Sage 50 does not have the ability to reverse bank reconciliations for a given month.
Also Read: Sage 50 Undo Last Reconciliation
Steps for Reset Bank Reconciliation in Sage
Step 1: Create a Backup File
Make a backup of your data, as all previously completed bank reconciliation information will be permanently lost if you don’t.
To back up your data file:
- Make sure you’re logged into the company file you want to back up.
- If you’re using Sage 50 Premium or Quantum, switch to single-user mode in Administration.
- Go to File > Backup.
- Alternatively, click the Backup icon (file cabinet) on the Home screen toolbar.
- In the Sage 50 Backup window, enter a file name. Including the date (e.g., UC141222) can be helpful.
- Choose the destination folder, but do not select the .SAJ folder.
- The last used backup path is saved and reused as the default.
- If you are unsure whether to overwrite an existing backup, avoid doing so.
- Finally, click OK to start the backup process.
Step 2: Generate a List of Outstanding Transactions
- Navigate to Reports > Banking > Account Reconciliation Report.
- Select “Summary report with Outstanding Transaction Detail” as the report type.
- Choose the appropriate bank account and relevant Start and End Dates.
- Set the option to “Report By Statement End Date.”
- Click OK to view the report.
- Save the report by choosing Print or Open in Excel.
Step 3: Clear the Bank Reconciliation
- Double-click on Chart of Accounts (or navigate through the Company tab in Enhanced View).
- Open the relevant bank account.
- Go to the Reconciliation & Deposits tab.
- Uncheck the box next to “Save Transactions for Account Reconciliation.”
- Click Save and Close, then confirm by clicking OK to remove all reconciliation data.
Step 4: Re-enable the Bank Account for Reconciliation
- Open the bank account again and go to the Reconciliation & Deposits tab.
- Check the box next to “Save Transactions for Account Reconciliation.”
- Click the Set Up button.
- Set up accounts for Interest Income, Error-Gain, Exchange Gain, and Adjustments.
- Optionally, create expense accounts for bank fees, NSF fees, and interest.
- Click Save & Close, and close the window.
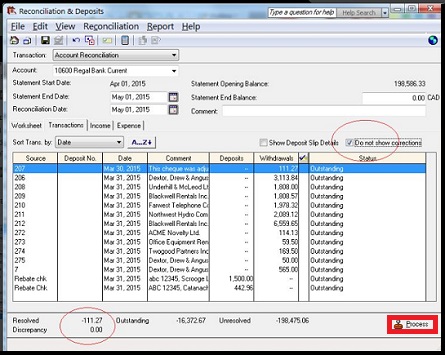
Step 5: Reconfigure Bank Reconciliation
- Open the Reconciliation & Deposits journal and select the correct bank account.
- Enter the Reconciliation Date, Statement Start Date, End Date, Opening Balance, and Ending Balance.
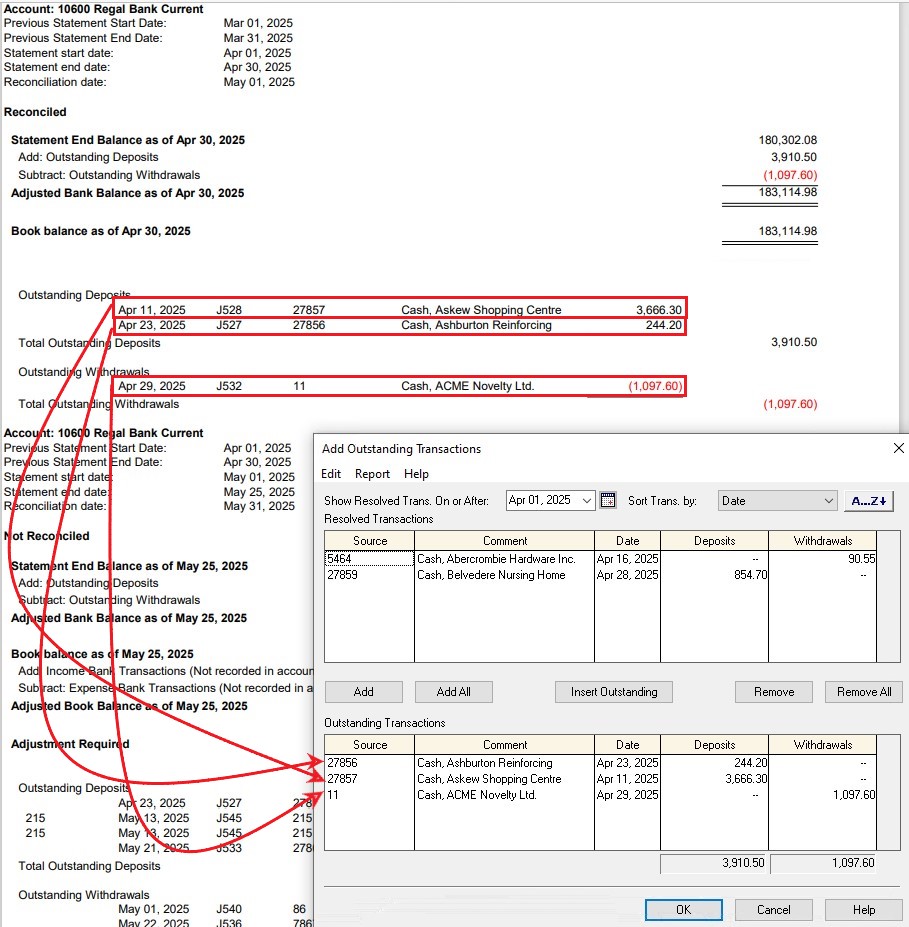
- Click Add Prior Outstanding to re-enter outstanding transactions from Step 2.
- Use the “Resolved Transactions” section to locate and add missing entries.
- If needed, manually insert outstanding items using the Insert Outstanding button.
- Click OK to confirm. If there are no outstanding items, simply click OK and proceed to reconcile.
How do you do a Bank Reconciliation in Sage 50?
What is the Bank Reconciliation in Sage 50 All About:
The main aim of the process of Bank Reconciliation is to check the concerned company’s financial records if they match the bank statement. It is also to ensure that the charges and the interest payments are recorded. This allows the users/customers to produce their statements to compare the transactions. In case they match, then it means that the reconciliation has been completed
The Importance of Bank Reconciliation in Sage 50 Accounts
Bank Reconciliation is an important aspect as it allows the user to be able to identify the errors within the transaction. It also allows the user to know if the bank balance matches what is within the user’s accounts. Finally with the help of the Bank Reconciliation, one is also able to identify any fraudulent transactions, if any as your bank reconciliation statement can easily flag up the delays in the cheque clearance.
What is the Frequency of Doing them?
Some users do the Bank reconciliation on an everyday basis. It is recommended that you get them done at a minimum at the end of every Calendar month. In case you run behind, then it is recommended that you get them done, in line with the VAT returns, this is to ensure that everything is rectified before the submission of the returns.
How to Do the Bank Reconciliation in Sage 50 Accounts
The Sage 50 software comprises the Bank Accounts module that contains the list of the bank accounts. To start, you need to highlight the bank account that you wish to reconcile and then click on the ‘Reconcile’ option located on top. This will launch the Reconciliation window:
- Next, you need to check if the correct Bank account is being displayed in the Window.
- Now navigate to the statement reference field, which displays the nominal bank account code, the current date, and the fact that it is the first one done by you.
- Now, you can easily add your reference here. This could be the sheet number from your bank statement or a range of sheet numbers or just the month and year. Ensure that you always reconcile up to a calendar month’s end in case you are doing your bank reconciliations on a say weekly basis.
- The final ‘ending balance’ will be displayed on the screen, and this is the amount that is displayed within the Sage Bank Account concerning the transactions that have been posted in and out of Sage. In case your banking is not updated and the transactions are missing or have been entered incorrectly then you will discover that the figure is not accurate.
- The ending balance figure should be entered here according to what the balance was at the end of the date you are reconciling up to from your actual bank statement.
- The statement date would comprise the date you are reconciling up to. Thus, the statement summary box also consists of the option to date you are reconciling up to reverse a previous reconciliation and you can post in here interest earned and bank charges, however even though these features are here, some people still prefer to post a bank receipt or payment for interest and account charges.
- Once done, click OK
- Now, you need to check the last reconciled balance located at the bottom if it agrees with the last reconciliation you did on Sage. This will be displayed in black if you have a positive figure in your accounts and red if you are overdrawn.
- Located at the top section are the un-matched transactions. Those are the items that are posted on Sage that you have not yet agreed to on your actual bank statement.
- Now you need to grab your printed or online bank statement and match what you find within your paper statement.
- You need to use your paper statement as your master guide and then find the transactions within Sage and match them from the top to the bottom.
- Also, Highlight the entries you wish to match and click on the “match” button or double left-click and this will relocate them from the top to the bottom.
- In case you have some things that are missing and you need to post them, this can be done from the reconcile screen by using the features located at the top of the screen.
- After you have gone through the process of matching everything from the top to the bottom, you need to check that you have zero differences.
- In case it is not zero, then you need to check if your ending balance has been signed correctly.
- In case you are dealing with an overdrawn balance or a credit card ensure that you have entered it as a minus.
- After your difference is zero you can then click “reconcile”.
- Be sure not to click reconcile if your difference is not zero.
Also Read: How to modify the start date of the statement of bank reconciliation?
Final Words
Once you have done your bank reconciliation and checked if your difference is zero, the next step is to run a bank statement to generate some evidence of what you have reconciled. It is recommended to get it done every calendar month and use this date range, assuming you have reconciled the whole of this period. This will generate a bank statement. The figure at the bottom should agree with the bank statement end balance that you have on your paper statement.
Next, you need to run an unreconciled transactions report. Having now run these two reports You would then want to agree this back to the Trial Balance. You can run your Trial Balance report within the Nominal Codes module.
Frequently Asked Questions:
Why do I need to undo Bank Reconciliation or Unreconcile a Transaction in Sage 50?
There are many situations where you are required to reconcile one or more bank transactions in error. There are a few options for dealing with this if it happens to you:
1. On each transaction, clear the bank reconciliation flag.
2. Reverse the bank reconciliation to the point when it was started.
3. Restore a backup
How do I Reverse Bank Reconciliation?
1. Go to the Bank accounts and then choose the required bank account
2. Click on the “Reconcile” >>> Reverse a reconciliation
3. Choose the relevant reconciliation and then click on the “Reverse reconciliation”
4. Click “Yes” and then complete the backup process
5. Finally, hit “Yes” in order to confirm bank reconciliation reversal.
What happens when you Reverse Reconciliation in Sage?
The associated transactions are listed as unreconciled and the bank reconciliation date is erased/removed when you reverse bank reconciliation. When you reverse bank reconciliation, you also reverse any reconciliation.