Sage 50 to QuickBooks Conversion Manual (Step-By-Step)
Updated On: April 8, 2025 12:16 pm
Looking for a smooth and simple process for Sage 50 to QuickBooks conversion? You’ve come to the right place.
User Navigation
If you need to convert your existing Sage 50 file to QuickBooks, this article will guide you through the process. We’ll cover everything you need to know about converting your data from Sage 50 to QuickBooks Desktop using the QuickBooks Conversion Tool. Just follow the steps in sequence.
Let’s proceed then!
Wait! Before you begin the conversion process, there are a few things you need to check.
Points to Remember Before Sage 50 to QuickBooks Conversion
- If you have not done so far, please install the QuickBooks Desktop software on the same system as Sage 50.
- Make sure to save both your Sage 50 and QuickBooks Desktop data on your local hard drive. If your file is hosted on a server or over a network, the QuickBooks Conversion Tool may encounter an error.
- If your data file is saved on a server, you’ll need to perform the conversion on that server.
- Before you start, make sure to create a complete backup of your Sage 50 data.
How to Convert an Existing Sage 50 File to QuickBooks?
Step 1: Setup your Sage 50
- Open the Sage 50 application
- Open the data file you need to convert
- Go to the main menu
- Click on the Maintain tab
- Go to the Users section
- Click on Setup Security
- Now click on the Data Access/Crystal Reports tab.
- Choose the option labeled ‘With the following login information
- Click on Change
- Set a suitable password for the transfer
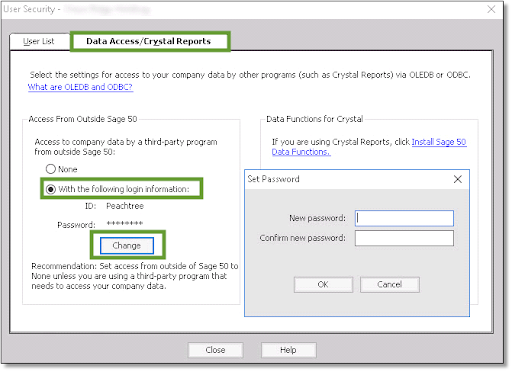
- Once done, click OK
- Then close the Sage 50 application
Step 2: Download and Setup the QuickBooks Conversion Tool
- Download the QuickBooks Conversion Tool
- Locate and open the folder where you have saved the downloaded file
- Right-click on the QuickBooks Conversion Tool icon
- Click on Properties
- Now go to the Compatibility tab
- Check the box labeled ‘Run this program in compatibility mode for
- Select Windows 8 (even if you have installed higher versions of Windows) from the dropdown
- Click OK to proceed
- Right-click on the QuickBooksConversionToolSetup.exe file
- Choose Run as Administrator
Step 3: Convert your Data
- Open the conversion tool
- Click on Browse
- Locate and choose the Sage 50 company file to convert
- The Pervasive 32-bit ODBC engine DSN Setup window will open up
- From the ‘Database Name’ dropdown, select your Sage 50 company file. If you have multiple files to convert, scroll to find the correct company name.
- Click OK

- Type in the Sage 50 password you created
- Click Next to continue
- Specify the QuickBooks Desktop version and edition to which you are converting your Sage data
- Select Browse
- Select the folder where you want to save your converted data
- Select Next. If you do not specify a folder, the data will be saved to your My Documents folder by default
- Review the entered details, and if everything looks good, click the ‘Convert File’ tab to begin the conversion.
- The QuickBooks software will start
- The QuickBooks – Application Certificate window will request for access to the company file
- Select Yes to proceed
- Choose ‘Prompt each time’ and then click ‘Continue’.
- The conversion tool will run now. Wait till the process completes. You will be prompted if the conversion is successful
- After the successful completion, a prompt will appear to Open in QuickBooks
- After a few minutes, the file will open in QuickBooks
Step 4: Review the Conversion
- After the QuickBooks tool is finished, click on Open in QuickBooks. Now, review your data in QuickBooks to ensure everything transferred correctly. Then review the transfer log as given below:
- Open the Windows Start menu
- Open the Windows File Explorer
- Browse to the location C:\USERS\[Your Windows User Name]\My Documents\Intuit\QuickBooks
- In this folder, open the failed transaction log file to check whether all your Sage data has been successfully transferred.
Also Read: How to Fix Sage 50 Data Conversion Error?
Final Words
We hope from the discussion above, you have got a fair idea of how to convert your existing Sage 50 file to QuickBooks. If you are still finding any difficulty in doing so on your own or if you have any more queries in this regard, we would suggest you to consult with an experienced Sage professional 1800 964 3096.
Frequently Asked Questions:
What Sage files am I allowed to Convert to QuickBooks?
You can convert the following types of Sage files to QuickBooks:
1. Account balances.
2. Employee, Item, Account, Vendor and Customer lists.
3. Employee profile and contact information.
4. Customer and vendor transactions.
5. Paychecks (you can convert them as journal entries).
6. Payroll General Ledger account balance information.
Can I Convert all Types of Sage files to QuickBooks?
No. There are certain types of Sage files you are not allowed to convert to QuickBooks. These include:
1. Individual employee wage or deduction information
2. Fixed Assets
3. Employee year-to-date info (paychecks, year-to-date adjustments and so on)
4. Customer and vendor transactions.
5. Payroll transactions
6. Payroll items on the basis of which paychecks are calculated (for example, medical insurance, salary payroll items, deductions, etc.)
7. Work tickets
8. Closed or partially closed Purchase Orders, Sales Orders and Estimates
What are the System Requirements that I need to fulfill for Sage 50 to QuickBooks Conversion?
You need to satisfy the following requirements:
1. Processor: 500 MHz Intel Pentium II and above.
2. Operating System: Windows 10, Windows 8.1, Windows 8.
3. RAM: 512 MB and above.
4. Space requirements: 2.5 GB free space.
5. Microsoft .NET framework: Version 2.0 minimum.
6. QuickBooks desktop: Pro, Premier, or Enterprise 2018 or higher.
7. Sage 50 versions: Sage 50 and Sage 50 Quantum version 2015 and higher.