How to Print 1096 Forms for 1099 Vendors in Sage 50?
Updated On: February 4, 2025 5:00 am

When it comes to business, you need to be able to handle a variety of different forms. From tax returns to purchase orders, there’s no shortage of documentation that needs to be handled. But printing these forms can be a time-consuming and tedious task. Fortunately, Sage 50 has you covered. In this blog post, we will show you print 1096 forms for 1099 vendors in Sage 50 quickly and easily. We’ll also provide some tips for making the process as smooth as possible so that you can stay organized and efficient.
User Navigation
- Accounting Professionals & Specialized Experts
- Steps for Print 1096 Forms for 1099 Vendors in Sage 50
- What is a 1099/ 1096 Form?
- What is Reported on a Form 1099-MISC?
- Changes to 1099 and 1096 Printing/efiling in Release 2023
- Solution:
- 1099-K Related Changes in Sage 50 Release 2023
- Solution:
- The 1099 Vendor Report
- Aatrix 1099-K and 1096 Form
- Chart of Accounts Import/Export
- Conclusion!
- Frequently Asked Questions:
Accounting Professionals & Specialized Experts
Want quick help from accounting software experts? Get in touch with our team members who can install, configure and configure your software for you. Proficient in fixing technical issues, they can help you quickly get back to work whenever you encounter an error in Sage software. Our team is available 24/7 365 days to assist you. To get in touch.
Sage 50 includes, among other things, fantastic features to help businesses file their annual taxes. With this accounting software, you can easily e-file the 1099 and 1096 forms. In this blog, we will discuss how to print the 1096 and 1099 forms in Sage 50.
Steps for Print 1096 Forms for 1099 Vendors in Sage 50
The 1096 form helps to make the Sage 1099 forms concise. It is sent to the IRS for the 1099-type vendors. Form 1096 is needed when one submit paper 1099 forms.
When 1099 forms is mailed to the IRS, let’s put them together and attach a separate 1096 for each group of 1099 forms. Here are a few steps:
- Go to the Accounts Payable section
- Click on Reports
- Click to open Form 1099 reporting
- Click on 1099 reporting visual
- Click on the form to use tab
- Click New
- Choose the form type to use against Interest , Dividend and Miscellaneous
- Select the 1099 calendar year
- Specify the merchant category
- Enter the minimum amount payable to vendors, as well as the year-to-date payments. Please keep in mind that this amount must be the same or greater than the amount entered.
- Check and confirm all the information related to the company
- After you accept the terms & conditions, a 1099 window would appear
- Click next to proceed
- Go to the checklist wizard
- Click on the print check list tab in order to print all the items on the 1099 form
- Click Finish
- Follow the same steps to complete the form in the next window as well
- Once you have confirmed all the details, the processing of 1099/1096 forms will begin.
- Now you need to decide the look of the form.
- Select the print format
- Select suitable forms
- Click on the forms viewer
- Acknowledge and verify your form
- Click on next to display the form
Also Read: Sage 50 1099 E-File
What is a 1099/ 1096 Form?
Before understanding what a 1099/1096 form is, you need to understand what a 1099 vendor is. It is simply a company or individual who does work for you but is not one of your employees. These vendors have the name because you must provide them with an IRS Form 1099 if you pay them more than $600 in a fiscal year. To keep your accounting books in order, you can send them Form 1099 even if they are not paid more than $600.Prior to actually making any such payments to 1099 vendors, gather all relevant information about them so that you can properly file 1099 forms during the tax season.
What is Reported on a Form 1099-MISC?
A Form 1099-MISC includes various types of payments. The following boxes are mostly used:
- Box 1- To report the amounts paid against rent of equipment real estate and machinery
- Box 2- To report royalty payments including the royalty fees paid already to the franchisors.
- Box 3- To report other income including the prizes received where the relevant service was not provided. Also includes the wages due to the deceased employees, which were later disbursed to the beneficiaries.
Changes to 1099 and 1096 Printing/efiling in Release 2023
Beginning with the release of 2023.0, the older method of printing 1099 and 1096 forms from the Forms menu is no longer possible, as it is not available. However, the good news is that all customers with an active plan will be able to access 1099/1096 forms via Aatrix to stay compliant with the latest tax form updates. Check out the table below for changes and how this will be applicable to you.
For more details on printing 1099-K forms, see 1099-K related changes in Sage 50 Release 2023.
Note: 1099-K forms can be printed from Release 2022 if you have subscribed to the tax service. However, the details on the forms will be required to be entered manually as the program does not have setup fields for 1099-K. In order to make sure of compliance, upgrade to Release 2023, as this also includes setup fields for 1099-K.
Sage Customer Support does not offers assistance for problems related to any third party products or enhancements, hardware, report customizations, state or federal tax-related questions, or specific accounting questions. For this it is advised to contact your Sage business partner, network administrator, or accountant for assistance. Also review this document for additional information on the scope of Sage Customer Support Services.
Also Read: Sage 50 2023 Download
Solution:
|
|
|
Sage 50 2022.x and Earlier Versions |
Sage 50 2022.x and Earlier Versions |
|
Required Forms and Customer plans |
Print 1099/1096 forms to pre-printed forms from Sage 50 (old method) |
All customers with or without an active plan |
N/A |
|
|
Print 1099/1096 forms from Aatrix |
All customers with an active plan with payroll |
All customers with an active plan, with or without payroll Note: You will need to purchase an Aatrix efile plan from Sage to use the Aatrix efile capabilities or use the Information Return Intake System (IRIS) with the IRS to efile manually.
|
Also Read: Delete an Account from the Chart of Accounts in Sage 50
1099/1096 Forms Needed to Print from Aatrix
|
Form Type |
Federal 1099 |
Federal 1096 |
Payer, Recipient, and State** |
Instructions*** |
|
eFile 1099-NEC |
Record Copy (plain paper) |
Record Copy (plain paper) |
Blank Perforated 4-Part (4-up) without backer |
Plain paper |
|
Printed 1099-NEC |
Red Pre-Printed Form (3-up)* |
Red Pre-Printed Form |
Blank Perforated 4-Part (4-up) without backer |
Plain paper |
|
eFile 1099-Misc |
Record Copy (plain paper) |
Record Copy (plain paper) |
Blank Perforated 4-Part (4-up) without backer |
Plain paper |
|
Printed 1099-Misc |
Red Pre-Printed Form (2-up) |
Red Pre-Printed Form |
Blank Perforated 4-Part (4-up) without backer |
Plain paper |
|
eFile 1099-INT |
Record Copy (plain paper) |
Record Copy (plain paper) |
Blank Perforated 4-Part (4-up) without backer |
Plain paper |
|
Printed 1099-INT |
Red Pre-Printed Form (2-up) |
Red Pre-Printed Form |
Blank Perforated 4-Part (4-up) without backer |
Plain paper |
|
eFile 1099-K |
Record Copy (plain paper) |
Record Copy (plain paper) |
Blank Perforated 4-Part (4-up) without backer |
Plain paper |
|
Printed 1099-K |
Red Pre-Printed Form (2-up) |
Red Pre-Printed Form |
Blank Perforated 4-Part (4-up) without backer |
Plain paper |
1099-K Related Changes in Sage 50 Release 2023
The Form 1099-K is a tax form that needs to be filed with an individual tax return for payments received through a third party network, like. Venmo, Paypal, Amazon, or credit/debit card transactions. Beginning in 2022, the payee needs to be issued a 1099-K if the service processes more than $600 worth of payments irrespective of the number of individual payments or transactions. Before 2022, the minimum threshold for issuing a 1099-K was $20,000. However, now that more small businesses will be receiving 1099-Ks, Sage 50 US 2023.0 will accommodate the change by allowing applicable customers to generate and e-file 1099-Ks through Aatrix. With the Release 2023.0, the 1099-K/1096 along with all other 1099 form types will only be accessible through Aatrix. The Sage 50 US In-Product and Custom 1099 forms are no longer available and are in fact hidden in the Forms Listview.
Changes in Release 2023.0
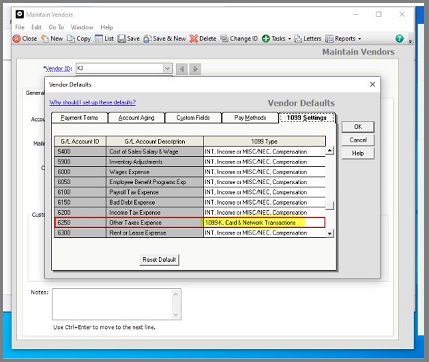
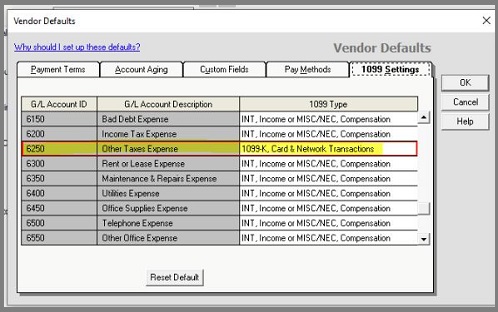
- The 1099 Settings within the Vendor Maintenance window now includes an option for 1099-K Card and Network Transactions
- The 1099 Settings field for Chart of Accounts Import/Export now comprises of the value of 14 for 1099-K
- The [NEW1099] section of the 1099info.Dat file now utilises Label 14 for 1099-K and Label 15 for None
- The 1099 Type field on the 1099 Vendor Report has been upgraded to include 1099-K
- The Aatrix 1099 Forms will now comprise of an option to create and e-file a 1099-K form
- The Sage 50 Help has been upgraded to reference 1099-K where applicable.
Solution:
1099 Settings in Vendor Maintenance
The 1099 Settings within Vendor Maintenance has been updated to include the option for 1099-K when creating 1099 Vendors with a type of Independent Contractor.
Also Read: Setting Up Accounts Payable in Sage 50
The 1099 Vendor Report
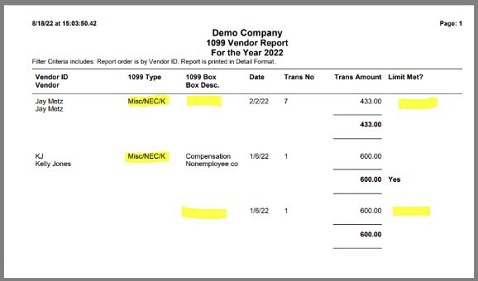
The Accounts Payable 1099 Vendor Report for Sage 50 US has been updated to include reference to the 1099-K Form. The 1099 Type field is now available as Misc/NEC/K. Additionally, the report will show 1099-K transactions. Nevertheless, the 1099 Box, Box Description, and Limit Met fields are blank when recording 1099-K transactions within the report.In the example below, the Vendor had a 1099-K and 1099-NEC payment. Note the 1099 Type change and that a majority of the fields are blank in case of the 1099-K transaction. Additionally, a transaction for a Vendor that has not met the $600 threshold will still display within the report.
Aatrix 1099-K and 1096 Form
Beginning in tax year 2022, Aatrix will offer the 1099-K and 1096 forms for those Sage 50 US customers who have paid the Vendors using credit, debit, store value cards, and also network transactions. All 1099 forms will be offered through Aatrix for Sage 50 US customers on a Sage plan, irrespective of whether you have a Payroll plan or not.
Presently, the 1099-K and the accompanied 1096 form are only available from Aatrix in test mode. Once the Aatrix has the 1099-K forms in Production, they will become available to all the users.
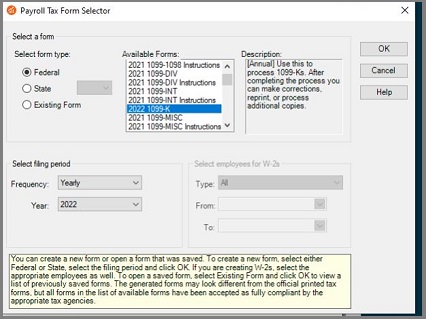
Any transaction that has been tagged as a 1099-K Payment will be displayed in the W2/1099 Preparer regardless if the $600 minimum is met; and, Aatrix does not accept negative values. It is within this window, where you can modify or delete the data in order to acquire all the correct 1099-Ks for a particular Vendor.
The payment details that populates from Sage 50 US is:
- Box 1a- Gross amount of payment
- Box 3- Number of payment transactions
- Box 5a-5l-Monthly gross transactions
- Box 6- Filing State
Aatrix will also offer the 1099-K Copy C for the Filer, 1099=K Copy A for the IRS, and the 1096 form as a summary. These documents can be printed or e-filed as required.
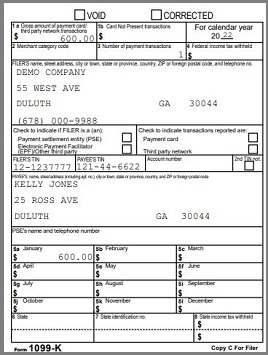
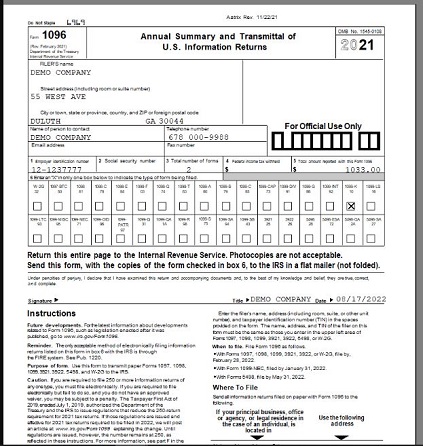
Chart of Accounts Import/Export
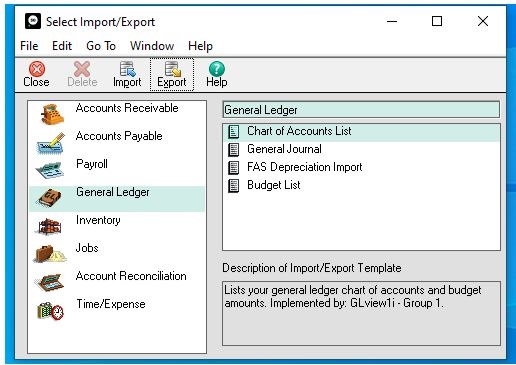
With the addition of the 1099 Setting included to accommodate for 1099-K, the Chart of Accounts Import/Export was slightly changed. The value of 14 was added within the 1099 Settings field if 1099-K is being utilized for the Import/Export.

Conclusion!
We hope the sequential steps mentioned above have cleared all of your doubts related to e-filing 1099/ 1096 forms in Sage 50. If you have any further questions or encounter any difficulties in carrying out the steps above, we recommend that you contact one of the authorized Sage experts.
Frequently Asked Questions:
Before Printing or e-filing the 1099 and 1096 forms in Sage 50, I am asked to verify the information entered on these Forms. How can I do this?
Step, before printing or e- filing the 1099 and 1096 forms in Sage 50
1. Go to the 1099 Setup Wizard in Sage 50
2. Check whether the Payer Identification Number (PIN) is correct select the correct 3. EIN or SSN
4. Click Next.
5. Check the Payer information
6. Click Next to proceed
7. Select the proper Tax Preparer Type
8. Click Next
9. The Third-Party Preparer Information window will open up
10. Specify the details in the appropriate fields
11. Click Next to proceed
12. Verify if all the State and Locality authorities/items are correct,
13. Click on Next.
14. Specify your preferred options on the Data Verification screen
15. Click Next.
16. Specify your options on the Recipient Identification Numbers screen
17. Click Next.
18. Choose your preferred options on the Multiple Data Files window
19. Click Next.
20. The W2/1099 Preparer worksheet will appear
21. Check whether all the information highlighted in blue is correct
22. Click on the Next Step tab
23. Proceed to check the highlighted information
24. Click on Next Step until the 1099 Printing and Filing Options window is displayed on your screen
What is the Procedure to Print or e-file the State Quarterly Forms?
1. Go to the Reports and Forms menu,
2. Select Forms
3. Click Tax Forms.
4. The Select a Report or Form window will be displayed
5. Next, double-click on Payroll Tax Forms
6. Click on the State form type
7. Select your state.
8. Specify the concerned state for which you wish to print /e-file.
9. Click on the select filing period section
10. Specify the year and quarter
Please Note: If you click on a new form, you will need to again select the year and quarter of your choice.
11. Click OK to continue
12. Follow the instructions as displayed on the screen
How to Print or e-File the 941/941B Federal Tax Forms?
Step to print or e-file the 941/941B Federal Tax Forms :
1. Go to the Reports and Forms menu.
2. Select Forms.
3. Go to the Tax Forms.
4. The Select a Report or Form window will appear on your screen.
5. Double-click on Payroll Tax Forms.
6. Click on the Available Forms box.
7. Choose the current 941/Schedule B/941-V Report.
8. Open the select filing period section.
9. Select the year.
